Pay in installments of $5.72 with
 ,
 and

Shipping Estimate
USA
- USA
- CAN
- USA
- CAN
Ships within 48 hours · Estimated delivery Nov 12 - Nov 17
 Promo Codes Available:
For Your Every Summer RSVP, with Code: SUMMER15
Description
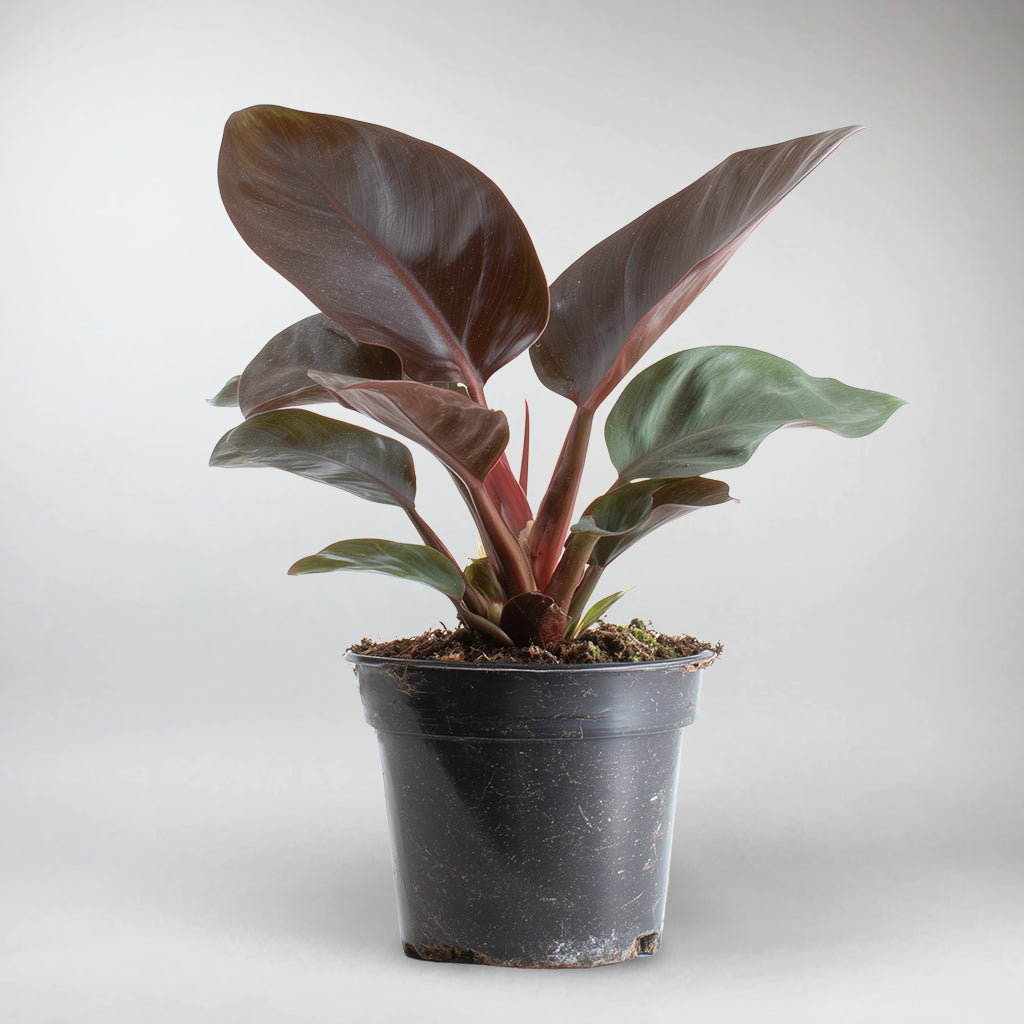
blushing philodendron indoor Blushing PhilodendronBlushing Philodendron Resilient, Dark, Mysterious Transform any room with the Blushing Philodendron! The burgundy tinged foliage matures into deep, glossy tones. This tall, dark, and beautiful plant adds refined drama to living areas or offices, evoking an upscale yet inviting ambience. Ideal for those who appreciate living dcor with a bold, contemporary edge. Plant Personality & Aesthetic Appeal New leaves emerge in a rich burgundy red, gradually
Blushing Philodendron – Resilient, Dark, Mysterious
Transform any room with the Blushing Philodendron! The burgundy-tinged foliage matures into deep, glossy tones. This tall, dark, and beautiful plant adds refined drama to living areas or offices, evoking an upscale yet inviting ambience. Ideal for those who appreciate living décor with a bold, contemporary edge.
Plant Personality & Aesthetic Appeal
New leaves emerge in a rich burgundy-red, gradually darkening to nearly black with a subtle sheen. Their broad, oval shape and slightly undulating margins lend a sculptural quality to each stem. In minimalist interiors, these leaves become focal points, contrasting beautifully with neutral palettes. In more eclectic schemes, they layer texture alongside woven baskets or ceramic planters. Place this plant on a desk beside a softly lit lamp, on a sideboard among framed art, or on a slim pedestal in a corner. It even works as a standout accent on a floating shelf.
Growth Habit & Size Potential
Unlike climbing philodendrons, the Blushing Philodendron forms a self-heading clump, reaching 60–90 cm in height and spreading 30 to 45 cm across. Growth is moderate: expect one to two new leaves each month during spring and summer. A 12 to 15 cm pot will allow this plant to thrive. It can allow for expansion before repotting is needed. If you want denser growth, prune spent stems at the base. No moss pole or trellis is required because its upright habit and predictable spread make it an excellent floor-standing or tabletop choice.
Light & Location Needs
This variety of plant flourishes in bright, indirect light, ideally near an east- or west-facing window. Direct midday sun can scorch new foliage, while too little light will dull its signature burgundy hue and slow leaf production. In lower-light corners, it will survive, though colour intensity and growth rate diminish. It also adapts well to a covered balcony or glazed conservatory, provided it is shielded from harsh afternoon rays. Do rotate from time to time to ensure even leaf growth.
Care Level & Maintenance Tips
Water once the top 5 cm of soil feels dry, typically every 7 to 10 days, using filtered room-temperature water. A free-draining mix with equal parts loam-based compost, orchid bark, and perlite maintains moisture without waterlogging. Feed this plant with a balanced, dilute houseplant fertiliser monthly in spring and summer; withhold feed in autumn and winter when growth slows. This philodendron is toxic if ingested, so keep out of reach of pets and children. Avoid overwatering and exposure to cold drafts, both common causes of yellowing leaves and stunted growth.
The Blushing Pride with the Blushing Philodendron
Why bring home this Blushing Philodendron? Don’t just do it for the visual impact - though you certainly could. Studies in biophilic design suggest that richly textured plants like this reduce stress levels and enhance concentration. Gazing at the dark, lustrous leaves can provide a calming reset even during the most hectic of workdays, making it an ideal companion for home offices. Although not exactly known for its air-purifying abilities, its presence still aids humidity balance. When close to seating areas or bedside tables, you feel that extra sense of relaxation and tranquillity. Vibes, you know?
Why You’ll Love the Philodendron Black Cardinal
Black Beauty: Bold and striking color.
The Hunger Games: Moderate growth rate.
Invisible Man: Adapts in any decor scheme.
Sense and Sensibility: For mental clarity and a sense of calm.
Beloved: Suits busy lifestyles.
The Hunger Games: Moderate growth rate.
Invisible Man: Adapts in any decor scheme.
Sense and Sensibility: For mental clarity and a sense of calm.
Beloved: Suits busy lifestyles.
Bring Home the Bold Blushing Philodendron
The Blushing Philodendron, also known as Philodendron Black Cardinal, is a unique plant indeed. In a sea of green, it looms dark and beautiful. Bring home your very own black beauty when you pick up the Blushing Philodendron!
What You’ll Receive
Size at dispatch: 20 cm in height, and comes in a 12 cm pot
Care level: Easy to Medium
Pet safety: No
Care level: Easy to Medium
Pet safety: No
Shipping Notes
- Free Standard Shipping on $100+ Orders to the USA.
- Except Preorder products are shipped in 48 hours.
- Delivery to the USA:
- Standard Shipping : 3-10 business days
- If time is of the essence, please consider selecting expedited delivery for faster service.
Exchange/Return Notes
- We offer a 30-day return/exchange service after receiving.
- Final sale items are not eligible for returns or exchanges.
- To process your return/exchange, please contact us at [email protected]
- Please click here for more details>>> Return & Exchange Policy
4.4 ★★★★★
Based on 25 reviews
Sort
Product Reviews
★★★★★ 4
One - Month Review
Set name: Ender 3 V3 SE, Set name: Ender 3 V3 SE
First - I wrote a out of the box review - I do not know if this review will replace the old review or compliment it. Just in case this review replaces the old review - I will repeat a few of the important points from the previous review.
I must also say it helps a great deal if you are already familiar with Ender because about 80% or more of the machine is built the same way as the older models. If this is your first Ender - read the instructions and check to make sure you have all the parts. Placing the parts where you can easily tear open the bags and not having to search for a part cuts down the assembly time. While the assembled printer takes up a small footprint - give yourself room to work.
This is my 3rd printer - my first one I made from scratch. It took about 2 weeks to get it assembled and another two weeks to get it to print properly. Most of that time was spent modifying the Martin software so it would run my machine!
My second one was an Ender V1. It took me about 90 minutes to assemble and about 30 minutes to get it to work. Over the years - I modified it to the point it was virtually impossible to tell the difference between it and a V3. I replaced it because a least one of the motors was going bad and I did not want to do the repairs.
I picked this printer for 3 reasons 1) it was on sale, 2) I am now wheelchair bound and needed a printer that did not require too much assembly, and 3) I had worked with Ender before and knew how they worked. I was able to keep some of the old parts from the old machine (but threw most away).
Everything was packaged well, but the small parts are in plastic bags that you have to tear or cut open - so be careful you do not lose any parts! There are only three parts to be assembled. They are the base, the frame, and the screen. I had no trouble getting the machine together - did have some trouble getting it to work. I was never able to reach customer service which ranged between "Who are you Kidding?" and "Did you really expect any?"
I did some internet searching (there is lots of stuff out there - many are good YouTube videos). I found I needed to do an update - it got a bit complicated here. Part of the update was done using the hidden slot on the LEFT side of the removable screen and part was done using a SD card on the LEFT side of the Unit. (Ender does NOT tell you this on their website!). I was already angry when I tried their slicer and it did NOT work - after not being able to get customer service again. I deleted their slicer and used my Cura. After doing a few prints using Cura (which works fine) a couple days later, I reinstalled their slicer and did some troubleshooting - I found I had a setting wrong. I use both Cura and their slicer now because of the differences. Each one has some features the other one lacks.
One example: The Cura has a large number of preset configurations, and it is easy to save a custom configuration.
The Creality titles the g-code with a filename that includes the estimate print time.
I tried customer service and actually someone! They did give me the manual settings for generic Pla - when I asked how to save those settings they send me to a useless link. I will research how to save one day - but will use my Cura for generic pla until then.
What I like about the machine.
1} While it is nosier (a trade-off for higher speed) - it is still much quieter than the original Ender I had before modifications.
2)The new ribbon and print head are a big improvement. The filament is easier to change, and you can easily make prints with different colors! I do not miss the bowden tube and individual wires at all!
3) I like to put my prints on a card. The old machine used a micro-SD card - and I quicky bought an adapter! The new machine takes regular SD cards and no adapter is needed!
4) I really like the automatic leveling feature. There have been times I have spent hours getting my manual table set the way I wanted. So far - it has worked great. I have only made about 50 prints - so I cannot tell you how reliable it is in long term use.
5) The quality of prints is much better than my old machine. I am not sure whether this due to being a better machine or the stepper motor needing replacement.
What I do not like:
1) The SD card has to be put into its slot upside down.
2) The controls and the SD card slot are all on the left side of the printer. I think putting the computer connection and the SD card would have been much better on the front of the machine.
3) Updating is like putting up a Christmas tree. The firmware is done with a hidden C connector on the left side of the detachable screen (this is like putting up a Christmas tree). Fine details on display etc. are put in using the SD card (this is like putting the lights on the tree). Once you figure out what goes where - it is the easiest printer to update I have had.
4. This one is a mixed bag. I do not give their customer service good marks - but the fact I found solutions on the internet was a good thing.
WAS THIS REVIEW HELPFUL?YesReportShare
Reviewed in the United States on April 5, 2026
★★★★★ 5
The K2 SE is a great entry level printer. Don't let the naysayers get you down!
Set name: K2 SE
I bought the K2 SE because it was inexpensive and I wanted to get into 3D printing. I had a Creality laser engraver that worked well, so I figured I'd go with the brand I knew. I bought the additional enclosure because I was planning to use this in the garage where my wood shop is, and I wanted to keep some dust out.
I have been pushing this thing pretty hard for three months now and it has not so much as looked at me cross eyed. It takes everything I throw at it. The quality seems to be there, as nothing is wearing out. I have a little superlube oil and grease to keep up the maintenance, and I suspect any failures people report have been on unmaintained machines. If you're the type that drives your car without changing the oil, 3D printing is not for you.
A quick note on 3D printing, for the uninitiated. When you see the one and two star reviews for the K2 SE, make sure you read why the reviewer is leaving the low rating. "Doesn't come with filament" - if you're not buying a combo with filament, none of the printers on the market come with filament. "Makes bubbles and pops when printing" - this is wet filament and not the fault of the printer (dry your filament). 3D printing is not a set it and forget it proposition, at least not at first. It requires a little skill (that can be built), a little knowledge (the U of Tube), and a little patience while you learn how to use the machine.
Now for the machine itself...
The print quality surprised me as a first time 3D printer user. I have purchased 3D printed items in the past and the lines were not something that impressed me. The K2 SE prints pretty much the same quality as the higher end Bambu Labs printers. The speed is all I could ask for, and I have fed this thing all kinds of PLA, PETG and TPU from Creality, Sunlu, Polymaker and AnyCubic without a problem. Any issues I have had have been the fault of the operator (me) not knowing I had to dry PETG before I use it. I have a Creality filament dryer now and dry my PETG right out of the package, then store it in an airtight container with dessicant. I have two printers running dried PETG sitting behind me right now and they're doing great.
If I have a single complaint about the K2 SE, it's the bed size. At 215 x 220 it's smaller than the industry "standard" of 256 x 256, and if you get some of the larger prints that are designed for a "standard" sized printer, they won't fit the build plate. But I knew that coming into this, because they advertise the size right up front.
Overall, I'm happy with the K2 SE. It was an excellent entry level printer and I have learned a lot from using it. I may even buy a second to add to my growing farm.
WAS THIS REVIEW HELPFUL?YesReportShare
Reviewed in the United States on May 20, 2026
★★★★★ 5
Creality K1 SE - Prints great with stock settings - needs a side spool mount
Set name: K2 SE, Set name: K2 SE
I bought the Creality K1 SE a little over a week ago. I had an Ender 3 S1 before this printer. The K1 SE is so, so much easier to print with right out of the box! I definitely recommend it. It's a good way to get the improvements that were built into Creality's K1C, but at a nicer price. Plus, you can install your own version of Klipper if you want.
I've printed 10 or so things in PLA and PETG, and I haven't had any failed prints. The automatic bed leveling has just worked. I have not had any problems with bed adhesion. On the Ender 3 S1, I only used a textured PEI plate, but the smooth build plate on the K1 SE works fine. The extruder cooling fan also seems ok for what I've printed so far. I printed an overhang test and the 75 degree overhang looks fine, but it had trouble at 80 degrees. The bridging test looked ok. (The longest bridge was only 25 mm on that test however.)
I've put the printer in a soft-sided enclosure that I had used for my old Ender 3 S1. (It's easy to find similar encolsures.) The LEDs on the K1 SE are bright enough to see inside which is something that I was concerned about before I purchased. However, this enclosure makes it difficult to access the back of the printer where the filament spool is mounted, so I designed a mount that clamps onto the side-bar - see the pictures. The files are on Printables - "Creality K1 SE Side Spool Mount".
WAS THIS REVIEW HELPFUL?YesReportShare
Reviewed in the United States on January 21, 2025
★★★★★ 3
Almost Good
Set name: K2 SE
The nozzle cleaning is completely ineffective. The wiper pushes material up the sides of the nozzle and melts onto the nozzle. The result is the nozzle leaves burnt debris on the prints. The calibration before each print only probes 5 points on the bed and the results are not satisfactory, with the nozzle being variously too close or too far from the bed. To adjust the z offset you have to go through several menus and the machine seems to not remember where you set it last time. Print quality is good except for VFAs. Part cooling fan is very loud at full speed.
WAS THIS REVIEW HELPFUL?YesReportShare
Reviewed in the United States on February 5, 2026
★★★★★ 5
Assembly Tricks And Tips.
Color: Dark Grey, Size: 5 Seat
All my packages came at same time. Assembly is in 3 phases, each box had the same complete instruction book, but each phase was not completely together in the same box. I immediately started opening boxes and just separated by letters. A's here, B's here. Not all A's or the other letters are the same, but it is very easy to follow the instructions. You won't get it mixed up. 3 hardware kits, it's pretty easy. Picture Book Difficulty :) The one large headboard piece was Letter M. There was no sticker on it, but there were no M stickers either. Pretty easy.
It's not a thick grandma's pull-out bed type of couch, but seems sturdy. I probably should have got the 3 year warranty, and I only have one kid. This isn't a couch to front-flip off the island on to, but it is nice and comfy and seems to be worth the cost. Assembly took about 2-3 hours casually I think. I used impact drill. Luckily it's 1 screw head size, then the socket for the nuts basically (provided). Communication with seller was easy and transparent. Idk what else people might be looking for in these reviews. It smelled completely fine. Good purchase. They say to air it out for a while, but I just assembled it immediately it didn't mess up anything.
OH! And a little trick for the double sided threaded bolts with no head, they can get stuck hand tightening it so tighten down one of the nuts all the way to the end of the exposed thread that sticks up, and you can thread those bolts that don't have a head WAY easier using the nut as the head. Then just loosen the nut back off of it. You'll understand what I mean. Thank You
WAS THIS REVIEW HELPFUL?YesReportShare
Reviewed in the United States on April 28, 2026